Investment Protection Through Professional Excellence
Your car is more than just a way to get around; it’s an investment. When you decide to protect that investment with Paint Protection Film (PPF), you want it done right. Trying to save a few bucks with a DIY job can often lead to more expensive problems down the road. Think about it: damaged paint, wasted film, and protection that just doesn’t hold up. That’s not what anyone wants.
Professional installers know the ins and outs of PPF. They use high-quality materials and have the skills to apply the film perfectly. This means your car gets the best possible protection, keeping its paint looking great for years. It’s about getting a flawless finish and long-term security for your vehicle.
Choosing a professional for PPF installation is key to safeguarding your vehicle’s appearance and value. They understand how to handle the film, prepare the surface correctly, and apply it without errors. This attention to detail makes all the difference in the final result and the film’s lifespan.
Mastering Surface Preparation for Flawless PPF Adhesion
The Critical Role of Initial Washing
Getting Paint Protection Film (PPF) to stick right starts long before the film itself is unrolled. It begins with a thorough wash. This isn’t just about making the car look shiny; it’s about removing loose dirt and grime that could get trapped under the film. Using a good car shampoo is key here. Cheaper stuff can leave behind residues that mess with how the PPF adheres later on. Think of it like trying to stick a label on a dusty bottle – it just won’t hold well. A quality wash gets rid of the obvious gunk, setting the stage for the next steps.
Thorough Decontamination Techniques
After the initial wash, the surface might look clean, but there are still tiny particles clinging to it. These are the real troublemakers for PPF installation. Environmental fallout, road tar, and other microscopic bits can prevent the film from bonding properly. This is where decontamination comes in. Using a clay bar is a common method. It grabs onto these stubborn impurities, leaving the paint surface incredibly smooth. A smooth surface is vital for the PPF to adhere without issues. Without this step, you’re essentially applying a protective layer over a bumpy, contaminated surface, which is a recipe for bubbles and lifting.
The Final Wipedown for a Residue-Free Surface
With the washing and decontamination done, there’s one last, important step before the PPF goes on: the final wipedown. This usually involves using a solution of isopropyl alcohol mixed with water. This mixture cuts through any remaining oils or residues from the previous steps, leaving the surface completely clean and dry. A clean microfiber towel is perfect for this. It picks up any lingering bits without scratching. This final wipedown is what guarantees a truly residue-free surface, giving the PPF the best possible chance to bond strongly and last for years. Proper surface preparation is key to avoiding common PPF installation problems.
Navigating Common PPF Installation Challenges
Even with the best intentions and careful preparation, installing Paint Protection Film (PPF) can present a few tricky spots. Understanding these common issues helps drivers know what to look for and when to seek professional help. It’s not always about avoiding problems entirely, but knowing how to handle them when they pop up.
Addressing Edge-Related Issues
One of the most frequent headaches with PPF is film lifting at the edges. This often happens when the film isn’t sealed down properly or if the edges are constantly exposed to harsh conditions. Properly sealed edges are key to keeping water out and the film secure. If you notice a small edge lifting, sometimes a gentle heat application and a firm press can fix it. However, if it’s a bigger area or happening in multiple spots, it’s best to have a professional look at it. They have the tools and know-how to address these edge-related issues effectively.
Preventing Surface Imperfections
Bubbles and wrinkles are the bane of a good PPF job. These often stem from not preparing the surface perfectly or using the wrong techniques during application. Think of it like trying to put a sticker on a dusty surface – it just won’t stick right. Using a good slip solution helps the film slide into place, and a proper squeegee technique pushes out air and moisture. The goal is a smooth, clear finish without any trapped air pockets.
Avoiding Visible Seams and Overlaps
When a single piece of PPF isn’t large enough to cover a panel, installers have to use multiple pieces, which can lead to visible seams or overlaps. The best installers use computer-cut patterns to get the most accurate fit, minimizing the need for seams. When seams are unavoidable, they are strategically placed in areas that are less noticeable, like panel gaps. Overlapping the film incorrectly can create a weak point or an uneven surface. A well-executed PPF installation should look as natural as possible, with minimal visible evidence of the film itself.
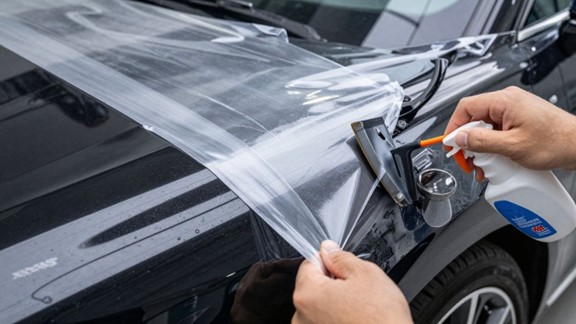
Essential Tools and Techniques for Quality PPF Application
The Difference Quality Tools Make
When it comes to applying Paint Protection Film (PPF), having the right gear isn’t just about making the job easier; it’s about getting it done right. Think of a chef without good knives or a painter without quality brushes – the results just won’t be the same. For PPF installation, this means having tools that allow for precision and control. Using cheap or worn-out tools can lead to mistakes that are hard to fix, like scratches on the film or even the paint underneath. Quality tools are an investment in a flawless finish.
Professionals rely on a specific set of items to achieve that perfect look. This includes specialized squeegees with different levels of firmness, which help to evenly spread the slip solution and push out air bubbles without damaging the film. Heat guns are also vital, but not just any heat gun; one that allows for temperature control is key to making the film pliable enough to conform to curves without stretching too thin. Having a good supply of lint-free cloths and a reliable spray bottle for the slip solution are also non-negotiable. These items work together to make the PPF application smooth and effective.
Beyond the basic squeegees and heat guns, there are other tools that separate a good installation from a great one. A good quality film plotter, for instance, is a huge advantage. This machine cuts the PPF to the exact specifications of your vehicle’s panels. This precision cutting is a major part of what makes a professional PPF job look so clean. Without it, installers have to cut by hand, which is much more prone to error and can lead to visible lines or uneven edges. The right tools really do make a world of difference in the final outcome.
Computer-Cut Patterns for Precision
One of the biggest game-changers in modern PPF installation is the use of computer-cut patterns. Instead of relying on a person to manually cut the film to fit each panel of a car, specialized software and plotters do the job with incredible accuracy. This means that the film is pre-cut to match the exact dimensions and curves of your vehicle’s specific make and model. This level of precision is hard to achieve with hand-cutting, even for experienced installers.
These computer-cut patterns significantly reduce the risk of errors during installation. Because the film is already shaped perfectly, the installer’s main job becomes carefully applying it to the panel. This minimizes the chances of stretching the film too much, which can cause distortion or weak spots. It also helps to avoid issues like uneven edges or the need for excessive trimming, which can sometimes compromise the film’s protective qualities. The accuracy provided by computer-cut patterns is a key factor in achieving a professional, almost invisible finish.
When you see a PPF installation that looks incredibly clean, with no visible seams or awkward edges, it’s often because computer-cut patterns were used. This technique is especially helpful for complex curves and body lines found on many modern vehicles. It allows the film to lay flat and adhere properly, providing the best possible protection without looking like an aftermarket addition. This precision is a hallmark of high-quality PPF work.
Strategic Seam Placement
Even with the best computer-cut patterns, some vehicles might require multiple pieces of PPF to cover certain areas, especially larger panels or those with intricate shapes. This is where strategic seam placement becomes important. A seam is essentially where two pieces of film meet. The goal is to make these seams as inconspicuous as possible, ideally in areas that are naturally less visible or where factory panel gaps already exist.
Experienced installers know where to place these seams to minimize their appearance. For example, they might run a seam along a body line or edge rather than across a flat, open surface where it would be more noticeable. This thoughtful placement helps the PPF blend in better with the vehicle’s design. It’s a technique that requires a good understanding of automotive design and how light reflects off surfaces. Proper seam placement is a sign of a skilled installer.
Ultimately, the aim is to make the PPF look as much like a factory finish as possible. While the ideal scenario is a single piece of film for each panel, this isn’t always practical or possible. When seams are necessary, their strategic placement is key to maintaining the aesthetic appeal of the vehicle. It’s a detail that, while small, has a big impact on the overall quality of the PPF installation. This attention to detail is what separates a good job from a truly professional one.
The Impact of Environment on PPF Installation Quality
Controlled Environments for Optimal Results
When it comes to applying Paint Protection Film (PPF), the space where the work happens really matters. Professional installers know this. They set up shop in clean rooms, often with special filters. This keeps dust and other tiny particles out of the air. Think of it like trying to paint a masterpiece in a sandstorm – not ideal. A controlled environment means the film goes on smoothly, without little bits of grit getting trapped underneath. This is a big part of why professional PPF installation looks so much better and lasts longer.
Temperature and Humidity Management
Temperature and humidity play a surprisingly big role in how well PPF sticks. Too cold, and the film gets stiff and hard to work with. Too hot, and the adhesive can get gooey and difficult to manage. The sweet spot is usually between 70 and 80 degrees Fahrenheit, with humidity around 30-50%. Professionals monitor these conditions closely. They use heaters or air conditioning to keep things just right. This careful management helps the film conform to the car’s curves and bond properly. Getting the environment right is key for a flawless finish.
The Role of Air Cleanliness
Air cleanliness is more than just a buzzword; it’s a necessity for good PPF work. Even a tiny speck of dust can cause a bubble or a bump under the film. This looks bad and can weaken the bond over time. Professional shops invest in air filtration systems to keep their installation bays as clean as possible. They might even use positive air pressure to push air out, carrying dust with it. This attention to detail in air cleanliness is what separates a professional job from something you might try in your own garage. It’s all about preventing problems before they even start.
Critical Post-Installation Care for PPF Longevity
Understanding the First 30 Days
The initial weeks after getting paint protection film (PPF) installed are super important. Think of it like letting a fresh coat of paint dry – you don’t want to mess with it too much. During this time, the film is still settling in and bonding with your car’s surface. Being gentle is key to making sure the PPF lasts as long as it should. This period is when you set the stage for years of protection.
Avoid harsh treatments and extreme conditions for the first month. This means no high-pressure car washes, no waxing, and keeping the car out of freezing temperatures or intense heat. The adhesive needs time to fully cure. If you’re wondering about the best conditions, most pros suggest keeping the car between 60°F and 90°F. This helps the film adhere properly without any issues.
Proper care after installation is just as vital as the installation itself. Rushing things can lead to problems like lifting edges or cloudy spots. Patience during this initial phase prevents headaches down the road and keeps your car looking sharp. Remember, this is a critical time for the paint protection film.
Wrapping Up: The Importance of Professional PPF Installation
When it comes to protecting your vehicle’s paint with Paint Protection Film (PPF), the installation process really matters. While the idea of saving money with a DIY approach might be tempting, the risks of poor adhesion, visible seams, or even damaging the paint underneath are pretty high. Professionals have the training, the right tools, and a controlled environment to get the job done right the first time. They know how to prep the surface perfectly, cut the film precisely, and apply it without bubbles or stretch marks. Plus, they can guide you on the proper care needed right after installation to make sure the film lasts. For a finish that looks great and truly protects your investment, trusting the job to certified experts is usually the smartest move.